Python Installation
Python is a powerful, versatile programming language that's perfect for beginners and professionals alike. This guide will walk you through installing Python 3 on various operating systems and configuring your environment for optimal use.
The instructions in this guide are for Python 3.x, which is the recommended version for all new Python projects.
Installation by Operating System
- macOS
- Windows
- Linux
macOS Installation
Using the Official Installer (Recommended)
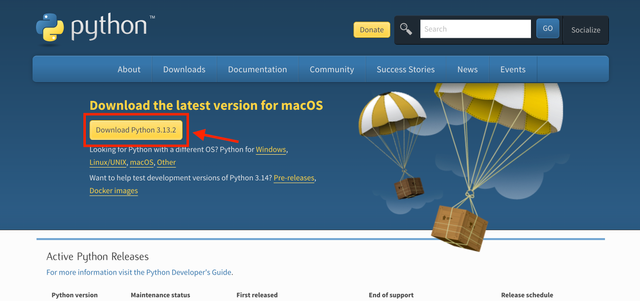
- Download the installer:
- Visit the official Python website
- Click on the "Download Python" button
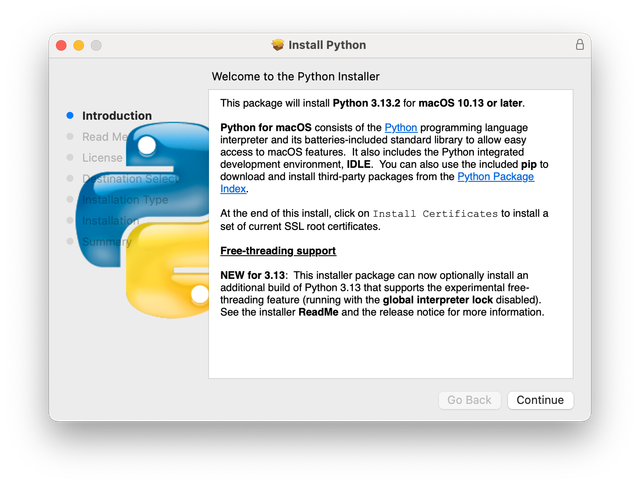
- Run the installer:
- Open the downloaded .pkg file
- Follow the installation wizard instructions
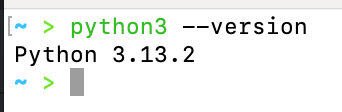
- Verify installation:
- Open Terminal (from Applications > Utilities or using Spotlight search)
- Type
python3 --versionand press Enter
Using Homebrew
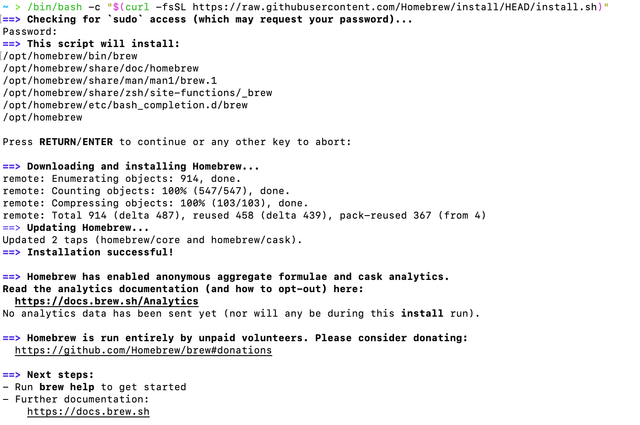
- Install Homebrew (if not already installed):
/bin/bash -c "$(curl -fsSL https://raw.githubusercontent.com/Homebrew/install/HEAD/install.sh)"
Then you will see...
- Install Python:
brew install python
- Verify installation:
python3 --version
On macOS, the system comes with a pre-installed version of Python 2.7. Always use python3 to ensure you're
using Python 3.
Windows Installation
Using the Official Installer (Recommended)
- Download the installer:
- Visit the official Python website: https://www.python.org/downloads/
- Click on the "Download Python" button (this will download the latest version)
- Run the installer:
- Important: Check the box that says "Add Python to PATH" before clicking "Install Now"
- Optionally, click on "Customize installation" for more options
- Verify installation:
- Open Command Prompt (search for "cmd" in the Start menu)
- Type
python --versionand press Enter - You should see the Python version number displayed
Using Microsoft Store
- Open the Microsoft Store
- Search for "Python"
- Select the version you want to install (choose the latest stable version)
- Click "Get" or "Install"
Using Chocolatey Package Manager
If you have Chocolatey installed:
choco install python
On Windows, you might need to use py instead of python in some cases, especially if you have multiple
Python versions installed.
Linux Installation
- Debian/Ubuntu
- Red Hat/Fedora
- Arch Linux
sudo apt update
sudo apt install python3 python3-pip python3-venv
sudo dnf install python3 python3-pip
sudo pacman -S python python-pip
To verify your installation:
python3 --version
pip3 --version
Most Linux distributions come with Python pre-installed. However, it's good practice to update to the latest version.
Verifying Your Installation
After installing Python, verify that everything is working correctly:
# Check Python version
python --version  # or python3 --version on some systems

# Start the Python interpreter
python  # or python3 on some systems

# In the interpreter, try a simple command
print("Hello, World!")

# Exit the interpreter (Ctrl+Z on Windows, Ctrl+D on Unix, or type:)
exit()
If you see the Python version displayed and can run the interpreter, your installation was successful!
Configuring Your IDE
What is an IDE?
An Integrated Development Environment (IDE) is a software application that provides comprehensive facilities to programmers for software development. It typically includes a code editor, debugger, and build automation tools.
Recommended IDEs for Python
- Visual Studio Code
- PyCharm
- Jupyter Notebook
Visual Studio Code (Recommended for beginners)
- Install VS Code:
- Download from code.visualstudio.com
- Install following the instructions for your OS
- Install Python extension:
- Open VS Code
- Go to Extensions view (Ctrl+Shift+X or Cmd+Shift+X)
- Search for "Python"
- Install the Microsoft Python extension
- Configure Python interpreter:
- Press Ctrl+Shift+P (or Cmd+Shift+P on macOS)
- Type "Python: Select Interpreter"
- Choose your installed Python version or virtual environment
VS Code offers excellent debugging tools for Python. To start debugging, add a breakpoint by clicking in the left margin next to your code, then press F5.
PyCharm
- Install PyCharm:
- Download from jetbrains.com/pycharm/
- Choose between Community (free) and Professional editions
- Install following the instructions for your OS
- Create a new project:
- Select "New Project" on the welcome screen
- Set the project location
- Choose the Python interpreter (system Python or virtual environment)
- Click "Create"
PyCharm Professional offers additional features like database tools, web development frameworks support, and remote development capabilities.
Jupyter Notebook
# Install Jupyter
pip install notebook

# Start Jupyter Notebook
jupyter notebook
For JupyterLab (next-generation interface):
# Install JupyterLab
pip install jupyterlab

# Start JupyterLab
jupyter-lab
Jupyter Notebooks are excellent for data analysis, visualization, and documenting your code with rich text explanations.
Troubleshooting Common Issues
Python Command Not Found
If you get a "command not found" error:
Windows:
- Ensure Python is added to PATH
- Try using
pyinstead ofpython
macOS/Linux:
- Try using
python3instead ofpython - Check if Python is installed:
which python3
pip Not Working
If pip commands fail:
- Update pip:
python -m pip install --upgrade pip - On some systems, use
pip3instead ofpip - Make sure you're in the correct virtual environment
Path Issues
If modules can't be found after installation:
- Check your PYTHONPATH environment variable
- Make sure you're installing packages in the active virtual environment
Permission Errors
If you get permission errors:
- On Windows: Run Command Prompt as Administrator
- On macOS/Linux: Use
sudoor install packages with the--userflag:
pip install --user package_name
Basic Python Configuration (Optional)
Creating a .pyrc File
You can create a Python startup file that runs every time you start the Python interpreter:
# ~/.pyrc or ~/.pystartup
# Add commonly used imports
import os
import sys
import math
import datetime as dt

# Define useful functions
def cls():
    os.system('cls' if os.name == 'nt' else 'clear')

# Set environment variables
os.environ['PYTHONDONTWRITEBYTECODE'] = '1'  # Don't create .pyc files
Then add to your shell profile:
# Add to .bashrc, .zshrc, etc.
export PYTHONSTARTUP=~/.pyrc
Environment Variables
Important Python environment variables:
# Control where Python looks for modules
export PYTHONPATH=/path/to/your/modules

# Don't create .pyc files
export PYTHONDONTWRITEBYTECODE=1

# Display warning messages
export PYTHONWARNINGS=default
Next Steps
Now that you have Python installed and configured, you can start learning and building projects! Here are some recommended starting points:
- Try a simple "Hello World" program
- Learn basic Python syntax and data structures
- Explore the Python Standard Library
- Build small projects to practice your skills
Remember, the best way to learn programming is by doing. Start with small projects and gradually build your skills!
If you spot any mistakes on this website, please let me know at [email protected]. I’d greatly appreciate your feedback! :)