C# Middleware
Introduction to Middleware
Middleware forms the backbone of ASP.NET Core applications. At its core, middleware is software that's assembled into an application pipeline to handle requests and responses. Each component in the pipeline:
- Chooses whether to pass the request to the next component in the pipeline
- Can perform work before and after the next component in the pipeline
This pipeline-based approach allows you to modularize your request processing logic, making your application more maintainable and flexible.
How Middleware Works
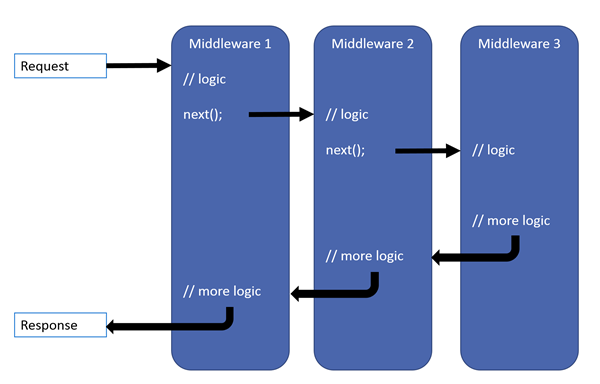
In ASP.NET Core, middleware executes in the order it's added to the pipeline. The request flows through each middleware component, and each component can:
- Process the incoming request
- Short-circuit the pipeline (not call the next middleware)
- Perform additional processing after the next middleware completes
This creates a "Russian doll" model where each middleware wraps around the next one.
Let's examine the basic structure of middleware:
public class CustomMiddleware
{
    private readonly RequestDelegate _next;

    public CustomMiddleware(RequestDelegate next)
    {
        _next = next;
    }

    public async Task InvokeAsync(HttpContext context)
    {
        // Logic executed before the next middleware

        await _next(context); // Call the next middleware

        // Logic executed after the next middleware
    }
}
Built-in Middleware in ASP.NET Core
ASP.NET Core includes several built-in middleware components that you can use in your applications:
| Middleware | Description |
|---|---|
| Authentication | Provides authentication support |
| CORS | Configures Cross-Origin Resource Sharing |
| Exception Handler | Catches exceptions |
| Routing | Defines and constrains request routes |
| Session | Provides session management |
| Static Files | Serves static files |
Adding Middleware to Your Application
Middleware is added to the application's request processing pipeline in the Configure method of the Startup class (or Program.cs in minimal APIs):
public void Configure(IApplicationBuilder app, IWebHostEnvironment env)
{
    if (env.IsDevelopment())
    {
        app.UseDeveloperExceptionPage();
    }
    else
    {
        app.UseExceptionHandler("/Error");
        app.UseHsts();
    }

    app.UseHttpsRedirection();
    app.UseStaticFiles();
    app.UseRouting();
    app.UseAuthentication();
    app.UseAuthorization();

    app.UseEndpoints(endpoints =>
    {
        endpoints.MapControllers();
        endpoints.MapRazorPages();
    });
}
For minimal APIs in .NET 6+:
var builder = WebApplication.CreateBuilder(args);

// Add services

var app = builder.Build();

if (app.Environment.IsDevelopment())
{
    app.UseDeveloperExceptionPage();
}
else
{
    app.UseExceptionHandler("/Error");
    app.UseHsts();
}

app.UseHttpsRedirection();
app.UseStaticFiles();
app.UseRouting();
app.UseAuthorization();

app.MapControllers();
app.MapRazorPages();

app.Run();
Creating Custom Middleware
There are three ways to create custom middleware:
1. Convention-based Middleware
This is the traditional approach, where you create a class with a specific structure:
public class RequestTimingMiddleware
{
    private readonly RequestDelegate _next;
    private readonly ILogger<RequestTimingMiddleware> _logger;

    public RequestTimingMiddleware(RequestDelegate next, ILogger<RequestTimingMiddleware> logger)
    {
        _next = next;
        _logger = logger;
    }

    public async Task InvokeAsync(HttpContext context)
    {
        var stopwatch = Stopwatch.StartNew();

        try
        {
            await _next(context);
        }
        finally
        {
            stopwatch.Stop();
            _logger.LogInformation($"Request {context.Request.Path} took {stopwatch.ElapsedMilliseconds}ms");
        }
    }
}

// Extension method to make it easier to add this middleware
public static class RequestTimingMiddlewareExtensions
{
    public static IApplicationBuilder UseRequestTiming(this IApplicationBuilder builder)
    {
        return builder.UseMiddleware<RequestTimingMiddleware>();
    }
}
Using this middleware in your application:
// In the Configure method or in Program.cs
app.UseRequestTiming();
2. Inline Middleware
For simple middleware, you can define it directly in the Configure method:
app.Use(async (context, next) =>
{
    // Do work before the next middleware
    Console.WriteLine($"Request received for: {context.Request.Path}");

    await next();

    // Do work after the next middleware
    Console.WriteLine($"Response status code: {context.Response.StatusCode}");
});
3. Using Map and MapWhen
ASP.NET Core provides methods to create branches in the pipeline:
// Only executes for paths that start with /api
app.Map("/api", apiApp =>
{
    apiApp.Run(async context =>
    {
        await context.Response.WriteAsync("API endpoint");
    });
});

// Only executes when the condition is true
app.MapWhen(context => context.Request.Query.ContainsKey("admin"),
    adminApp =>
    {
        adminApp.Run(async context =>
        {
            await context.Response.WriteAsync("Admin panel");
        });
    }
);
Real-World Example: Request Logging Middleware
Let's create a middleware that logs all requests to a file:
public class RequestLoggingMiddleware
{
    private readonly RequestDelegate _next;
    private readonly string _logFilePath;

    public RequestLoggingMiddleware(RequestDelegate next, string logFilePath)
    {
        _next = next;
        _logFilePath = logFilePath;
    }

    public async Task InvokeAsync(HttpContext context)
    {
        // Log request information
        string logMessage = $"[{DateTime.Now}] {context.Request.Method} {context.Request.Path}{context.Request.QueryString} - {context.Connection.RemoteIpAddress}";

        // Continue processing
        await _next(context);

        // Log response status code
        logMessage += $" - Status: {context.Response.StatusCode}";

        // Write to file asynchronously
        using (StreamWriter writer = File.AppendText(_logFilePath))
        {
            await writer.WriteLineAsync(logMessage);
        }
    }
}

// Extension method
public static class RequestLoggingMiddlewareExtensions
{
    public static IApplicationBuilder UseRequestLogging(
        this IApplicationBuilder builder, string logFilePath)
    {
        return builder.UseMiddleware<RequestLoggingMiddleware>(logFilePath);
    }
}
How to use this middleware in your application:
// In the Configure method or in Program.cs
app.UseRequestLogging(Path.Combine(env.ContentRootPath, "logs.txt"));
Middleware Order Matters
The order in which you add middleware components is crucial. For example:
// Wrong order - authentication should come before endpoints
app.UseEndpoints(endpoints => { /* ... */ });
app.UseAuthentication(); // Too late!

// Correct order
app.UseAuthentication();
app.UseAuthorization();
app.UseEndpoints(endpoints => { /* ... */ });
A typical middleware pipeline might look like:
- Exception handling
- HTTPS redirection
- Static files
- Routing
- CORS
- Authentication
- Authorization
- Custom middleware
- Endpoints
Middleware Activation
ASP.NET Core supports two middleware activation systems:
- Constructor injection: Services can be injected through the middleware constructor.
- Per-request activation: Some services (scoped services) should be injected in the
InvokeAsyncmethod.
public class MyMiddleware
{
    private readonly RequestDelegate _next;
    private readonly ISingletonService _singletonService;

    // Constructor injection for singleton or transient services
    public MyMiddleware(RequestDelegate next, ISingletonService singletonService)
    {
        _next = next;
        _singletonService = singletonService;
    }

    // Per-request activation for scoped services
    public async Task InvokeAsync(HttpContext context, IScopedService scopedService)
    {
        // Use scopedService here
        await _next(context);
    }
}
Summary
Middleware is a powerful concept in ASP.NET Core that allows you to:
- Process requests and responses in a modular way
- Create a pipeline of components that handle requests in order
- Short-circuit the pipeline when needed
- Perform pre-processing and post-processing around other middleware
By understanding how middleware works and how to create your own middleware components, you can build more maintainable and flexible web applications in C#.
Exercises
- Create a simple middleware that adds a response header with the current server time.
- Implement a middleware that logs the execution time of each request to the console.
- Build a middleware that checks if a specific query parameter exists and redirects to a different page if it doesn't.
- Create a middleware that catches exceptions and returns a custom error page.
Additional Resources
💡 Found a typo or mistake? Click "Edit this page" to suggest a correction. Your feedback is greatly appreciated!